

Russian cuisine: The best recipes
Interesting Facts About Olivier Salad
History: Olivier Salad was created in the 1860s by chef Lucien Olivier at the «Hermitage» restaurant in Moscow. The original recipe included more gourmet ingredients, such as crayfish tails, quail eggs, and wild mushrooms.
Holiday Symbol: Olivier has become an integral part of the New Year’s table in Russia and other CIS countries, associating it with celebrations and family gatherings.
Regional Variations: Different countries have their own versions of Olivier, using various ingredients. For example, in Latin American countries, it is often prepared with avocado.
Olivier Salad is not just a dish; it is a part of a culinary tradition that unites generations and creates a festive atmosphere. Enjoy your meal!
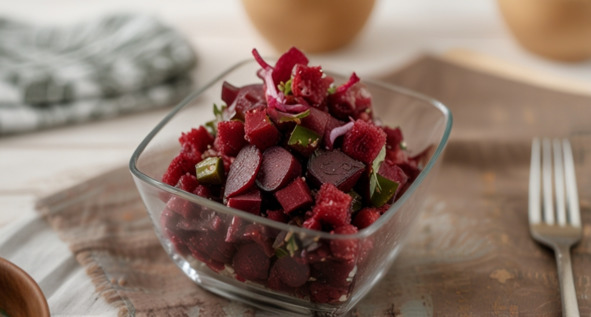
Vinaigrette
Vinaigrette is a classic Russian salad that combines the freshness of vegetables with a sweet and sour dressing. It is not only delicious but also healthy due to the variety of ingredients. Let’s go through how to prepare a tasty vinaigrette.
Ingredients:Beets – 2 pcs (medium-sized)
Potatoes – 2 pcs (medium-sized)
Carrot – 1 pc (medium-sized)
Sauerkraut – 200 g (optional)
Cucumbers (pickled or fresh) – 2 pcs
Onion (optional) – 1 pc
Green peas (canned) – 1 can (300 g)
Vegetable oil – 3—4 tbsp
Vinegar (9%) – 1—2 tbsp (to taste)
Salt and black pepper – to taste
Greens (dill or parsley) – for decoration
DirectionsPreparing the Vegetables: Thoroughly wash the beets, potatoes, and carrots. Boil them in their skins until cooked. Beets should be boiled separately to prevent coloring the other vegetables. This usually takes about 30—40 minutes.
Cooling: After boiling, allow the vegetables to cool. Then peel them and cut into cubes of about 1 cm.
Mixing the Ingredients: In a deep bowl, combine the diced beets, potatoes, carrots, sauerkraut, finely chopped cucumbers, and finely chopped onion. Add the green peas (drain the liquid beforehand).
Dressing: In a separate bowl, mix the vegetable oil, vinegar, salt, and black pepper. Dress the salad with this mixture and gently mix to avoid damaging the vegetables.
Serving: Transfer the vinaigrette to a salad bowl, garnish with greens, and serve. Vinaigrette can be served either cold or at room temperature.
Cooking Tips
Color and Flavor: To prevent the beets from coloring the other vegetables, add a little vinegar to the salad – this will help maintain the vibrant colors.
Ingredient Combinations: Feel free to experiment with the ingredients by adding items like boiled beans, apples, or even boiled meat for a heartier version.
Infusion: Let the vinaigrette sit in the refrigerator for 1—2 hours before serving. This will allow the flavors to meld together and make the salad more flavorful.
Dressing: For a more interesting taste, you can add a bit of mustard or honey to the dressing.
Interesting Facts About Vinaigrette
History: Vinaigrette appeared in Russia in the 19th century and became popular due to its simplicity and the availability of ingredients.
Symbol of Health: Vinaigrette is considered one of the healthiest salads because of its high vitamin and fiber content.
Regional Variations: In different regions of Russia, vinaigrette can vary in composition – some places add apples, while others include mushrooms.
Festive Dish: Vinaigrette is often prepared for festive occasions, especially for New Year’s celebrations, where it holds a special place on the table.
Now you know how to prepare a delicious and healthy vinaigrette. Enjoy your meal!
Holodets
Holodets is a traditional Russian dish served cold. It consists of a jelly-like mass made from meat broth with pieces of meat, vegetables, and spices. Not only is it delicious, but it is also very filling. Let’s go through how to properly prepare holodets.
Ingredients:Meat (pork, beef, or chicken) – 1.5 kg (it’s best to use meat with bones to achieve the jelly consistency)
Carrot – 1 pc
Onion – 1 pc
Garlic – 3—4 cloves (optional)
Bay leaves – 2—3 pcs
Peppercorns – 5—6 pcs
Salt – to taste
Water – 3—4 liters
Greens (dill, parsley) – for decoration
DirectionsPreparing the Meat: Rinse the meat well under cold water. Remove excess fat and membranes. If using beef, you can cut it into large pieces; it’s better to leave the pork whole.
Making the Broth: Place the meat in a large pot and cover it with cold water so that it rises 5—7 cm above the meat. Bring to a boil over medium heat, then reduce the heat to low. Skim off any foam that forms on the surface.
Adding Vegetables and Spices: Add the peeled whole carrot and onion, bay leaves, peppercorns, and salt to the broth. Cover with a lid and simmer on low heat for 4—6 hours. The longer you cook it, the richer the broth will be.
Preparing for Cooling: After cooking, remove the meat and vegetables from the broth. Strain the broth through cheesecloth or a fine sieve to eliminate any remaining fat and small particles.
Cooling: Cut the meat into small pieces. In a deep dish or individual bowls, place the pieces of meat and vegetables, if desired. Pour the strained broth over everything. Allow it to cool to room temperature, then refrigerate for 6—8 hours (preferably overnight) to let the holodets set.
Serving: Before serving, cut the holodets into portions, garnish with greens, and serve with mustard or horseradish.

Cooking Tips
Meat Selection: To achieve a richer and clearer broth, use meat with bones (such as pig’s feet or beef ribs). This will help create a jelly-like texture.
Vegetables: To make the holodets look more appetizing, you can add diced boiled carrots and herbs.
Broth Clarity: To ensure the broth is clear, avoid vigorous boiling. Cook on the lowest heat so that it just simmers gently.
Extra Flavor: For a more unique holodets, add a bit of soy sauce to the broth.
Interesting Facts About Holodets
History: Holodets has a long history and was known as far back as Ancient Rome. It became particularly popular in Russia in the 18th century.
Symbol of Celebration: Holodets is often prepared for festive tables, especially for New Year’s and other celebrations.
Health Benefits: Holodets is rich in collagen, which is beneficial for skin, joints, and hair.
Regional Variations: In different regions of Russia, holodets may have its unique features – for example, in some places, gelatin is added to speed up the setting process.
Now you know how to prepare traditional Russian holodets. Enjoy your meal!
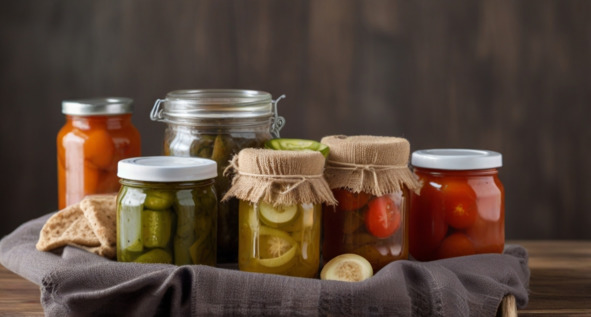
Pickles and Marinades
Pickles and marinades are not only a way to preserve vegetables and fruits for a long time, but also a wonderful method to add vibrant flavors to your dishes. In this chapter, we will explore the main methods of making pickles and marinades, as well as share interesting facts about them.
Basic Preservation MethodsThere are several primary methods for preserving vegetables and fruits:
Salting: This method relies on the use of salt, which draws moisture out of the products, creating an environment that is unfavorable for bacterial growth.
Marinating: This method uses vinegar, sugar, and spices to create an acidic environment that also prevents spoilage.
Fermentation: This process involves fermenting vegetables in salted water, which gives them a distinctive taste and aroma.
Ingredients for Pickles and Marinades
Main Products: Cucumbers, tomatoes, cabbage, peppers, carrots, radishes, mushrooms, and many other vegetables and fruits.
Spices: Garlic, dill, bay leaves, black and red pepper, mustard, coriander, horseradish, and others.
Liquids: Water, vinegar (9% or 6%), vegetable oil, sugar, salt.
Sterilizing Jars
Sterilizing jars is an important step in preparing for canning, which helps prevent spoilage of the products. Here are several methods for sterilizing jars before making marinades or jams:
Oven SterilizationPrepare the Jars: Wash the jars thoroughly with soap and hot water, then rinse them with clean water.
Preheat the Oven: Set the temperature to 120—150° C (248—302° F).
Sterilization: Place the jars upside down on a baking sheet and put them in the preheated oven. Leave them for 10—15 minutes.
Cooling: Carefully remove the jars using kitchen mitts and let them cool.
Stovetop SterilizationPrepare the Jars: Wash the jars with soap and rinse them.
Fill the Pot: Place the jars in a large pot and fill it with water so that it covers the jars by 2/3.
Boiling: Bring the water to a boil and boil the jars for 10—15 minutes.
Cooling: Carefully remove the jars with tongs and let them cool.
Boiling Water SterilizationPrepare the Jars: Wash the jars with soap and rinse them.
Boil Water: Bring water to a boil in a pot.
Pour Over the Jars: Place the jars in the sink or a large bowl and pour boiling water over them. Leave for 5—10 minutes.
Cooling: Carefully remove the jars and let them cool.
Microwave SterilizationPrepare the Jars: Wash the jars with soap and rinse them.
Fill the Jars: Fill the jars with water up to 1/4 full and place them in the microwave.
Sterilization: Turn on the microwave at high power for 5—10 minutes (the time depends on your microwave’s wattage).
Cooling: Carefully remove the jars, empty the water, and let them cool.
Helpful Tips for Sterilization
Lids: Don’t forget to sterilize the lids as well. You can boil them in water for 5—10 minutes or treat them in the oven.
Handling Hot Jars: Use kitchen mitts or tongs to avoid burns.
Sterility: Work with jars and lids only with clean hands or gloves to avoid contamination.
Sterilizing jars is a simple but crucial step that will help keep your preserves in perfect condition!
Recipes for Pickles and Marinades
1. Salted Cucumbers
Ingredients:Cucumbers – 1 kg
Water – 1 liter
Salt – 100 g
Garlic – 3—4 cloves
Dill – 1 bunch
Bay leaves – 2—3 pieces
Black peppercorns – 5—6 pieces
Directions:Thoroughly wash the cucumbers and soak them in water for 2—3 hours.
In a pot, bring the water to a boil and dissolve the salt in it.
Pack the cucumbers into a jar, adding the chopped garlic, dill, bay leaves, and pepper.
Pour the hot brine over the cucumbers, ensuring they are completely covered.
Seal the jar with a lid and leave it at room temperature for 2—3 days, then transfer it to a cool place for 1—2 weeks.
2. Marinated Tomatoes
Ingredients:Tomatoes – 1 kg
Water – 1 liter
Vinegar – 200 ml
Sugar – 100 g
Salt – 50 g
Garlic – 3—4 cloves
Dill – 1 bunch
Spices to taste (pepper, bay leaves)
Directions:Thoroughly wash the tomatoes and pierce them with a knife in several places. In a pot, mix the water, vinegar, sugar, and salt, and bring to a boil.
Pack the tomatoes into sterilized jars, adding garlic, dill, and spices. Pour the hot marinade over the tomatoes, ensuring they are completely covered.
Seal the jars with lids and let them cool at room temperature. Then transfer them to the refrigerator.
3. Sauerkraut
Ingredients:Cabbage – 1 kg
Carrot – 1 piece
Salt – 20 g
Spices (optional): bay leaves, black pepper, dill seeds.
Directions:Shred the cabbage and grate the carrot on a coarse grater. In a deep bowl, mix the cabbage, carrot, and salt.
Knead the mixture well to release the juice. Pack the cabbage into a clean jar or pot, pressing it down tightly.
Cover the cabbage with cheesecloth or a lid and leave it at room temperature for 3—5 days.
Check daily to ensure the cabbage is covered with juice. If necessary, add a little water. After fermentation, transfer the cabbage to the refrigerator.
4. Tips for Beginners
Cleanliness: Use sterilized jars and lids to avoid spoilage of the products.
Proportions: Pay attention to the proportions of salt and sugar in the marinade, as they affect the taste and preservation.
Experiment: Don’t be afraid to experiment with different spices and additions to find your perfect flavor.
5. Interesting Facts About Pickles and Marinades
Ancient Traditions: The salting and pickling of vegetables and fruits have been practiced for thousands of years. It is one of the oldest methods of food preservation.
Health Benefits: Fermented products contain probiotics that are beneficial for digestion.
Variety: Different cultures have their unique recipes and methods of preservation, such as kimchi in Korea or tsukemono in Japan.
Pickles and marinades are not only a way to preserve food but also an opportunity to delight yourself and your loved ones with delicious snacks. Try, experiment, and enjoy the results of your labor!
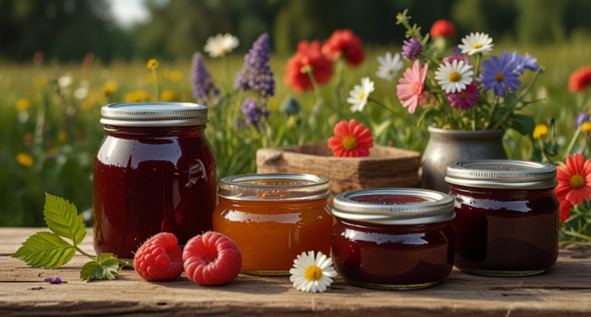
Russian Jam
Jam is one of the most popular ways to preserve fruits and berries for the winter. It not only retains the taste and aroma of fresh products but also allows you to enjoy their health benefits all year round. In this chapter, we will look at recipes for jam made from currants, apples, pumpkin, and strawberries, as well as share some useful tips for preparation.
1. Currant Jam
Ingredients:Currants (red or black) – 1 kg
Sugar – 1.2 kg
Water – 200 ml (optional)
Directions:Thoroughly wash the currants and remove any stems and leaves. In a pot, mix the currants with sugar. If you prefer a thinner jam, add water. Let the mixture sit for 1—2 hours to release the juice.
Place the pot over medium heat and bring to a boil, stirring. Reduce the heat and simmer for 15—20 minutes, skimming off any foam.
Check the readiness of the jam: a drop should not spread on a plate. Pour the hot jam into sterilized jars and seal with lids.
2. Apple Jam
Ingredients:Apples – 1 kg
Sugar – 800 g
Lemon juice – 1 tablespoon
Spices (optional): cinnamon, cloves
Directions:Peel the apples, remove the seeds, and cut them into small pieces. In a pot, mix the apples with sugar and lemon juice. Let it sit for 1—2 hours to allow the apples to release their juice.
Place the pot over medium heat and bring to a boil. Reduce the heat and simmer for 30—40 minutes, stirring occasionally.
Add spices to taste and cook for another 10—15 minutes. Check the readiness of the jam. Pour into sterilized jars and seal.
3. Pumpkin Jam
Ingredients:Pumpkin (peeled) – 1 kg
Sugar – 800 g
Water – 300 ml
Orange or lemon zest – to taste
Directions:Cut the pumpkin into small cubes. In a pot, mix the pumpkin, sugar, and water. Let it sit for 1—2 hours.
Place over medium heat and bring to a boil. Reduce the heat and simmer for 30—40 minutes, stirring occasionally.
Add the zest and cook for another 10—15 minutes until reaching the desired consistency. Pour the hot jam into sterilized jars and seal.
4. Strawberry Jam
Ingredients:Strawberries – 1 kg
Sugar – 700 g
Lemon juice – 2 tablespoons
Directions:Rinse the strawberries, remove the stems, and cut them in half or into quarters. In a pot, mix the strawberries with sugar and lemon juice. Let it sit for 1—2 hours.
Place over medium heat and bring to a boil. Reduce the heat and simmer for 15—20 minutes, stirring gently.
Check the readiness of the jam. Pour into sterilized jars and seal.
5. Helpful Tips for Making Russian Jam
Sterilization: Before filling jars with jam, be sure to sterilize them to prevent spoilage.
Checking Readiness: To check if the jam is ready, drop a small amount onto a cold plate. If the drop doesn’t spread, the jam is ready.
Storage: Store the jam in a cool, dark place. Once opened, it’s best to keep it in the refrigerator.
Jam is a fantastic way to preserve the taste of summer and autumn for the long winter months. It’s perfect for serving with tea and using in baking.
Section 2: First Courses
Shchi – Russian Cabbage Soup
Cabbage soup, or «shchi,» is a traditional Russian dish that combines simplicity with rich flavor. It’s the perfect first course for the cold season, warming you up and filling you with energy. Let’s make some shchi!
Ingredients:Fresh cabbage – 400 g
Potatoes – 3—4 medium-sized
Carrot – 1
Onion – 1
Tomatoes (or tomato paste) – 2 (or 2 tablespoons of paste)
Meat (beef or pork) – 300 g (optional)
Garlic – 2—3 cloves
Dill or parsley – to taste
Salt, pepper – to taste
Bay leaf – 1—2
Water or broth – 1.5—2 liters
Vegetable oil – 2 tablespoons
DirectionsPreparing the Meat (if using): If you choose to add meat, cut it into small pieces. In a heavy-bottomed pot, heat the vegetable oil and sauté the meat until golden brown. This will give the broth a rich flavor.
Sautéing the Vegetables: Add diced onion and grated carrot to the meat. Sauté over medium heat for 5—7 minutes until the onion becomes translucent.
Adding the Cabbage: Cut the cabbage into thin strips and add it to the pot. Sauté for another 5 minutes, stirring. This helps the cabbage release its flavor.
Adding the Potatoes: Peel and dice the potatoes, then add them to the pot.
Tomato Base: If using fresh tomatoes, chop them and add to the pot. If using tomato paste, add it along with the water. This will give the shchi a vibrant color and flavor.
Pouring in the Broth: Add water or meat broth (about 1.5—2 liters) to the pot. Bring to a boil, then add the bay leaf, salt, and pepper to taste.
Конец ознакомительного фрагмента.
Текст предоставлен ООО «Литрес».
Прочитайте эту книгу целиком, купив полную легальную версию на Литрес.
Безопасно оплатить книгу можно банковской картой Visa, MasterCard, Maestro, со счета мобильного телефона, с платежного терминала, в салоне МТС или Связной, через PayPal, WebMoney, Яндекс.Деньги, QIWI Кошелек, бонусными картами или другим удобным Вам способом.
Приобретайте полный текст книги у нашего партнера: